
This website uses cookies. For further information on how we use cookies you can read our Privacy and Cookie notice
HomeGarden & OutdoorsGenerators & Portable PowerSolar & Wind PowerEnergy ControllersPwm Solar Controller 20a 30a 40a 50a 60a 12v/24v/48v Automatic Recognition Automatic Universal Usb Smart Charging Led Display
/product/79/1372941/1.jpg?0736)
/product/79/1372941/2.jpg?0736)
/product/79/1372941/3.jpg?0736)
/product/79/1372941/4.jpg?0736)
/product/79/1372941/5.jpg?0736)
/product/79/1372941/6.jpg?0736)
Share this product
Shipped from abroad
Pwm Solar Controller 20a 30a 40a 50a 60a 12v/24v/48v Automatic Recognition Automatic Universal Usb Smart Charging Led Display
UGX 265,756
UGX 458,35842%
In stock
+ shipping from UGX 53,179 to Central Business District
0 out of 5
(No ratings available)Variation available
Promotions
Delivery & Returns
Shipped from abroad
Choose your location
Pickup Station
Delivery Fees UGX 53,179
Ready for pickup between 24 May & 29 May when you order within next 6hrs 3mins
Door Delivery
Delivery Fees UGX 60,079
Ready for delivery between 24 May & 29 May when you order within next 6hrs 3mins
Return Policy
Free return within 7 days for eligible items.Details
Seller Information
Syrinrnga
60%Seller Score
Be the first to follow
Seller Performance
Order Fulfillment Rate: Very Poor
Product details
The characteristics are as follows:
1) 12V/24V automatic identification or 48V2)humanized LCD display and double bond operation man-machine interface 3) full se of technical data set and modify 4) efficient smart PWM three charging5) can choose the loading control template, in theevening time can be set on the street6) reliable protection: overvoltage,short circuit, overload, overcharge,over discharge protection function7) accurate temperature compensation, correct charging and discharging voltage,automatically prolong the service life of the battery8) input terminal positive and negative extreme reverse connection protection
Safety advice
1) The controller will check the ambient temperature to adapt to the charging voltage, so the controller should be as close as possible (30~100cm) to the battery. 2) 18V solar panels are connected to 12V batteries, and 36V solar panels are connected to 24V batteries. 3) In order to make a terminal board, try to use a copper wire twisted body. Loose power connections and/or wire corrosion can cause electrical connections, melting of wires, burning of insulation, surrounding materials, and even fires4) The controller is only suitable for various lead-acid batteries, please do not use other batteries (lithium batteries, nickel-hydrogen batteries)
 1.day mode 2.evening mode3.solar panel4.battery5.battery power display 6.time setting 7.load 8.unit9.digital display 10.setting parameter items
Control and connection installation instructions
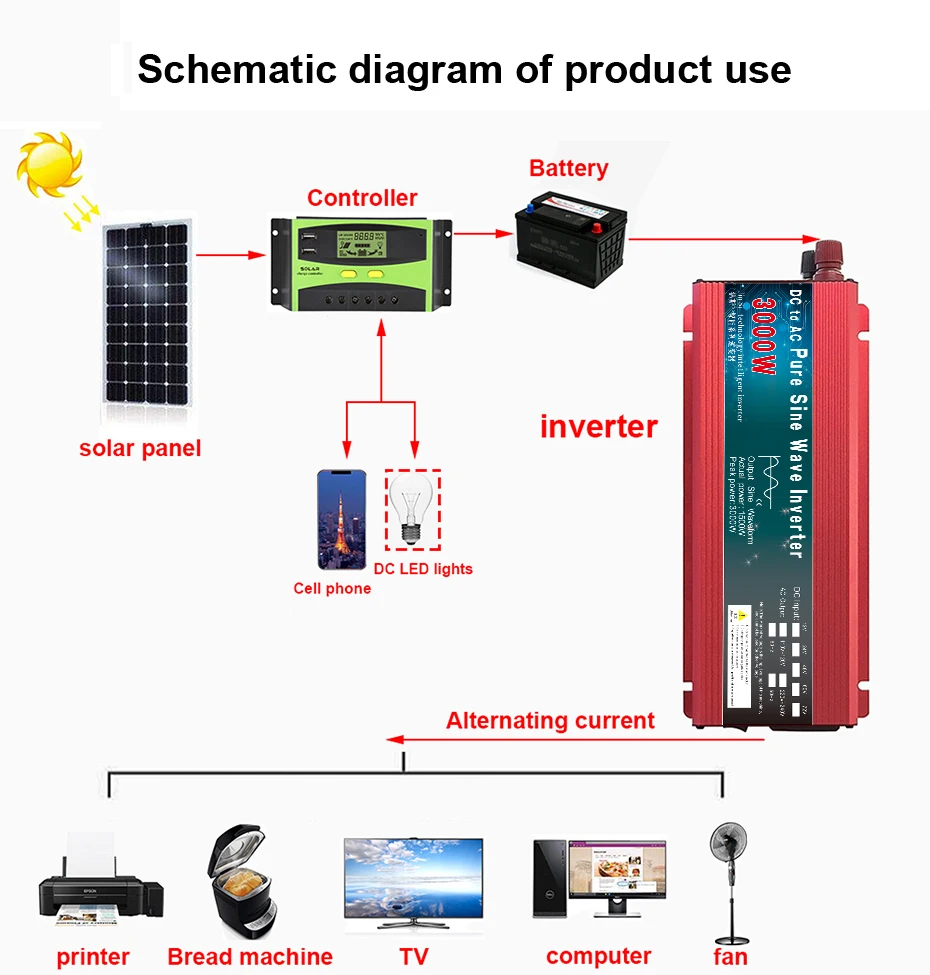
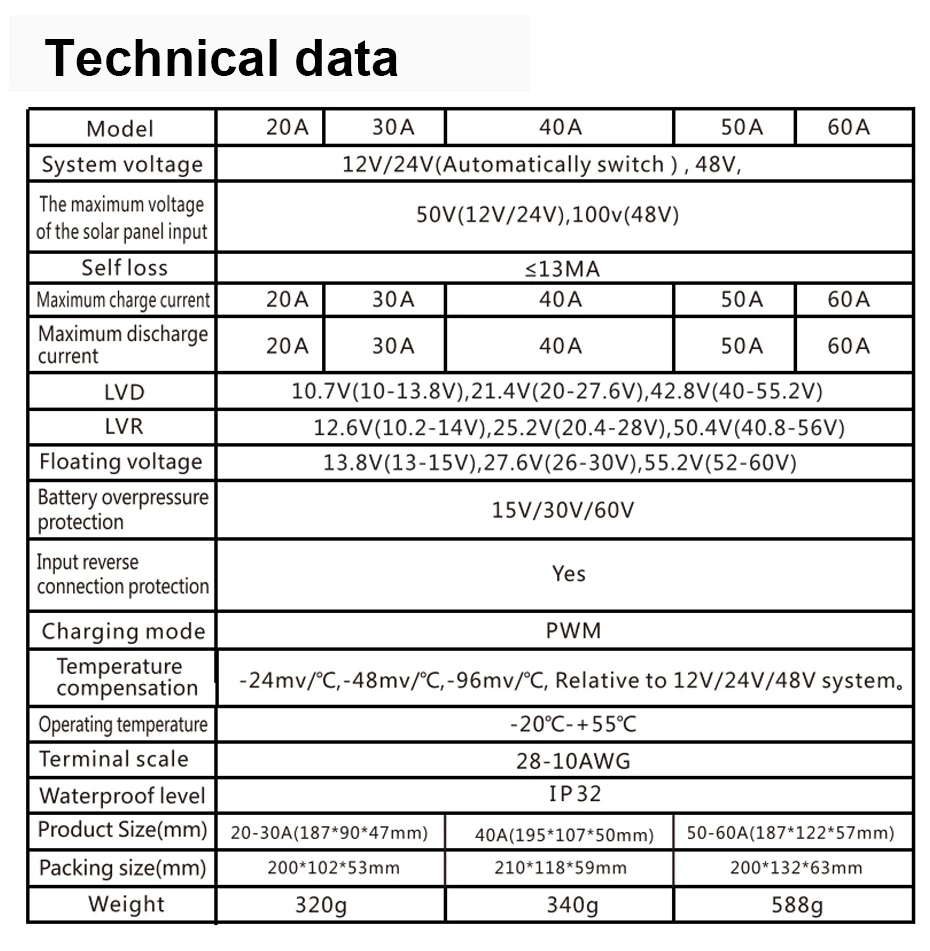
1)the controller should be installed in a well ventilated place,avoiding direct sunlight and high temperature,should not be installed in the Water canpenetrate into the controller.2) select the correct screw to install the controller on the wall or other platforms, M4 or M5 screw, screw cap The diameter should beless than 10mm.3)keep enough space between the wall and the controller for cooling and smooth connection4) the mounting hole distance is 20-30A(178*60mm),40A(80*185mm), 50-60A (98*178mm), the diameter of the mounting hole is 5mm.5)in order to better connect, when packaging, all terminals are very tight, linked together, please first All terminals are loose 6)AsshowninFigure,positive and negative fist properlyconnected batteryandcontolle.Inorderto avoid short circuit, the batteryScrewonto thecontroller thenconnect the solar panel, andthenconnecttheload
*warning:please according to the above(1) (2) (3) are connected in sequence,otherwise it will damage the battery and the controller of the consequences!*if a short-circuit occursat the controller terminal it will cause fire or leakage, and must Be very careful.(westrongly recommend connecting the battery side fuses to the control1.5 times the rated current of the instrument)*after theproperconnection is successful,the sun is bright enoughand the LCD screen will showthe solar panel from the sun An arrow that can hook the battery to the battery williht up
Operation instruction
(1) 20A/30A operation instructions *the power on,press the"menu"on in the main interface, will urn into the menu in the maininterface short press The 'function" key can turn onand off the load output(Note:the controller that sets the parametercan be reset afterpower failure is the default
1) The main interface display settingsFigure (1);this interface long press"menu"on toenter the 3Sabove,after the selection of three types ofbattery press Mode (FLD closed lead acid battery mode,SLD open lead acid battery mode, colloid battery mode), The defaultis battery mode. 2) Temperature display interfaceFigure (2);the temperature of the working envment of the controller can be viewed at this interface.3) Charging current interfaceFigure (3), this interface parameter allows you to see the value of the charge current of the solar panel to the battery The abovemenu'on afterentering 3S, can adjust thevoltagevalue of solar three charging modes. (FLOAT Float voltage,ABSORB charging voltage,charging voltage EQU equilibrium)4) Load current interfaceFigure (4)), this interface parameter allowsyou to see the value of the discharge current of the battery to theload More than a single "key afterentering the 3S,you can set the battery low voltage protection*(LVD)*,batterylow voltage reset Voltage(LVR),*1-24 hour light control with delay setting mode (detail setting method seventh points)(detall setting method seventh points)5)Cumulative charge power (An )Figure (5), this parameteris the charged AHcounter, which shows the total power output of the solar panel Theinterface is long, press the menu key more than 5S, and the counter will be zero6)Theulative discharge of power (An )Figure(6);the parameter to discharge power meter,it shows theload energy consumption,long press this interface The menu key gauge will be zero.7)Warning display interfaceThe warning interface displayed after the protection circuit is started
(2) 40A/50A/60A operating instructions *The controller will have 1s in power after the initialization interface,and then enter the maininterface.(Note:setup parameters The controller canbe reset to the default power) *press the"menu"on in the main interface, will turn into the menu in the maininterface,short press"function" on,You can open and close the output load.
()The main interface display settings 1.Set the ABBORB (solar charging voltage)Figure (1), the main interface in the long press"menu" on above 3S,enter the ABSORB setup,press"menu" When the number starts to flash,press the "function" on to set the solar charging voltage.After setting,press the on again The"menu"on can be locked out.Press the "menu"on to exit (3S exit is arranged under the same operation).2.Set the FLOAT (solar float voltage)Figure (2), press the"menu"key 3S above the main interface, and then click"function" after entering the ABSORB settings interface"Key, display the FLOAT settings interface, press a menu key,and when the numbers begin to flash,press the function on again Set the solar float voltage, after setting, press the "menu"on to lock.3.Set theD voltage (battery low voltage protection voltage) Figure (3), press the"menu"key 3S above the main interface, then enter the ABSORB settings interface,and press the two function"Key, display theD settings interface, press a menu key,and when the numbers begin to flash,press the function on. The battery low voltage protection, setup is complete, click a menu on lock. 4.Set theR (battery low voltage reset voltage)Figure (4), press the "menu"key 3S above the main interface, then enter the ABSORB settings interface, and press the three function"Key, display theR settings interface, press a menu key,and when the numbers begin to flash, press the function on The battery low voltage reset, setup is complete, click a menu on lock. 5.Choose the battery charging modeFigure (5),press menu on more than 3s in the main interface, then pressfunction four times after entering ABSORB setting interface key, display battery mode settings interface, press"menu"key once, when letters start to flicker, then press "function" Select battery mode by key and select three battery type modes by function key(FLD plus liquid lead-acid battery mode, SLD) Sealed liquid-free battery mode,colloidal battery mode,default is battery mode,after setting,and then Press the menu on once to lock.6.Setting temperature trimFigure (6), press the "menu"key 3S above the main interface, then enter the ABSORB settings interface,and press the five function"Key,display temperature adjustment setting interface, press "menu" on,letters start flashing,press"function"Key setting temperature adjustment, after setting is finished, press again"menu"key lock7.Set light control modeFigure(7),press the"menu"key 3S above the main interface, then enter the ABSORB settings interface,and press the six function"on, display light control mode settings interface, press the "menu"key, the letters begin to flash, and then press "function"Key set light control mode, *00 is pure light control mode,*01-15 is hour light control plus delay mode,and 24 is load constant Open mode. After setup is complete, click a menu on lock.
If you have problems, do not understand the operation, you can also consult customer service~
About shipping
Shipping and Packaging All itwill be double checked and well packed before sending.Itwill be dispatched within 2 business days after buyers pay for the order. It usually takes about 14 to 18 working days for delivering the package to the destination(for remote areas,it may take a little longer).
Special Announcement:
Please fill in the correct and detailed consignee, address and phone number in the order. For fast and correct delivery.If you do not receive order within 30 working days,please feel free to contact Customer Service before leaving Negative and Neutral Feedback, we will do our best to help you resolve the problem.TaxNo, you will only pay what is quoted as total cost at checkout, no more. You are not expected to pay any additional duties ores. If you are asked by Customs or our logistic partner to pay duties, please contact our Customer Service .
Your 100% satisfaction is very ant to us
If the product is not on good condition, You can return this product within 14 working days, please contact customer service center before returning.FeedbackYour satisfaction is our first priorityIf you receive the order and it is in good condition,we would be grateful if you would leave us 5 star Positive Feedback for the transaction.
1) 12V/24V automatic identification or 48V2)humanized LCD display and double bond operation man-machine interface 3) full se of technical data set and modify 4) efficient smart PWM three charging5) can choose the loading control template, in theevening time can be set on the street6) reliable protection: overvoltage,short circuit, overload, overcharge,over discharge protection function7) accurate temperature compensation, correct charging and discharging voltage,automatically prolong the service life of the battery8) input terminal positive and negative extreme reverse connection protection
Safety advice
1) The controller will check the ambient temperature to adapt to the charging voltage, so the controller should be as close as possible (30~100cm) to the battery. 2) 18V solar panels are connected to 12V batteries, and 36V solar panels are connected to 24V batteries. 3) In order to make a terminal board, try to use a copper wire twisted body. Loose power connections and/or wire corrosion can cause electrical connections, melting of wires, burning of insulation, surrounding materials, and even fires4) The controller is only suitable for various lead-acid batteries, please do not use other batteries (lithium batteries, nickel-hydrogen batteries)
 1.day mode 2.evening mode3.solar panel4.battery5.battery power display 6.time setting 7.load 8.unit9.digital display 10.setting parameter items
Control and connection installation instructions
1)the controller should be installed in a well ventilated place,avoiding direct sunlight and high temperature,should not be installed in the Water canpenetrate into the controller.2) select the correct screw to install the controller on the wall or other platforms, M4 or M5 screw, screw cap The diameter should beless than 10mm.3)keep enough space between the wall and the controller for cooling and smooth connection4) the mounting hole distance is 20-30A(178*60mm),40A(80*185mm), 50-60A (98*178mm), the diameter of the mounting hole is 5mm.5)in order to better connect, when packaging, all terminals are very tight, linked together, please first All terminals are loose 6)AsshowninFigure,positive and negative fist properlyconnected batteryandcontolle.Inorderto avoid short circuit, the batteryScrewonto thecontroller thenconnect the solar panel, andthenconnecttheload
 *warning:please according to the above(1) (2) (3) are connected in sequence,otherwise it will damage the battery and the controller of the consequences!*if a short-circuit occursat the controller terminal it will cause fire or leakage, and must Be very careful.(westrongly recommend connecting the battery side fuses to the control1.5 times the rated current of the instrument)*after theproperconnection is successful,the sun is bright enoughand the LCD screen will showthe solar panel from the sun An arrow that can hook the battery to the battery williht up
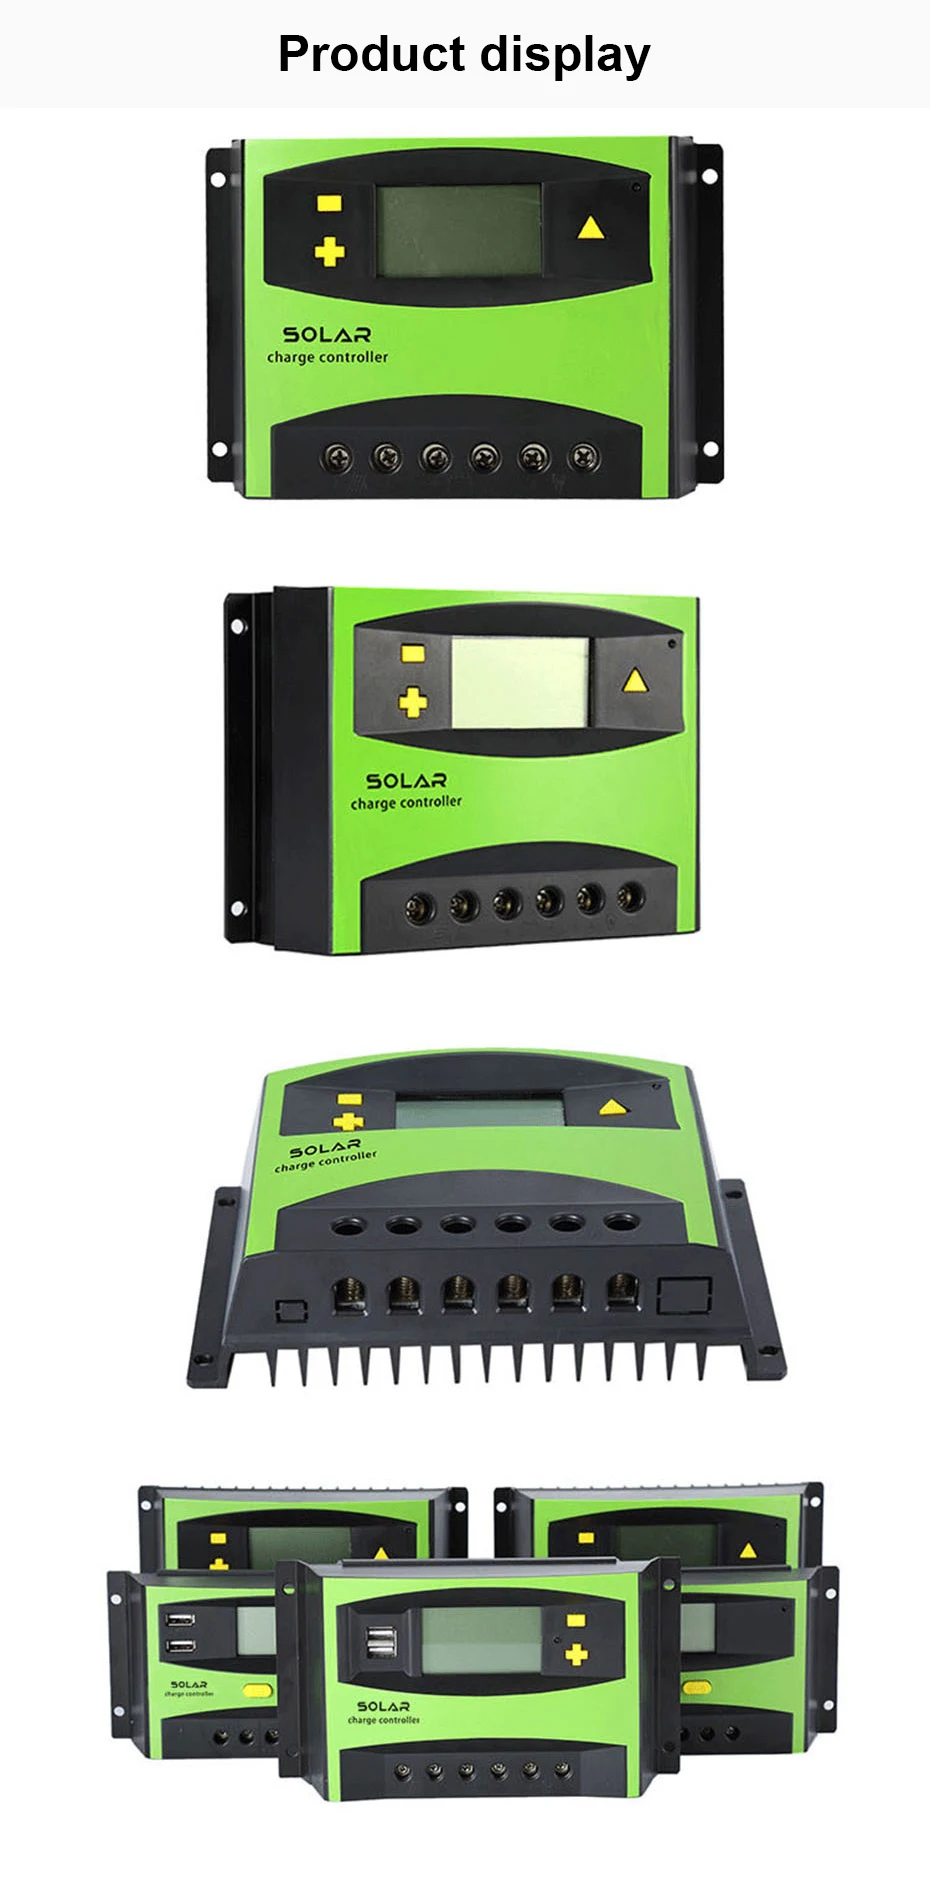
 Operation instruction
(1) 20A/30A operation instructions *the power on,press the"menu"on in the main interface, will urn into the menu in the maininterface short press The 'function" key can turn onand off the load output(Note:the controller that sets the parametercan be reset afterpower failure is the default
 1) The main interface display settingsFigure (1);this interface long press"menu"on toenter the 3Sabove,after the selection of three types ofbattery press Mode (FLD closed lead acid battery mode,SLD open lead acid battery mode, colloid battery mode), The defaultis battery mode. 2) Temperature display interfaceFigure (2);the temperature of the working envment of the controller can be viewed at this interface.3) Charging current interfaceFigure (3), this interface parameter allows you to see the value of the charge current of the solar panel to the battery The abovemenu'on afterentering 3S, can adjust thevoltagevalue of solar three charging modes. (FLOAT Float voltage,ABSORB charging voltage,charging voltage EQU equilibrium)4) Load current interfaceFigure (4)), this interface parameter allowsyou to see the value of the discharge current of the battery to theload More than a single "key afterentering the 3S,you can set the battery low voltage protection*(LVD)*,batterylow voltage reset Voltage(LVR),*1-24 hour light control with delay setting mode (detail setting method seventh points)(detall setting method seventh points)5)Cumulative charge power (An )Figure (5), this parameteris the charged AHcounter, which shows the total power output of the solar panel Theinterface is long, press the menu key more than 5S, and the counter will be zero6)Theulative discharge of power (An )Figure(6);the parameter to discharge power meter,it shows theload energy consumption,long press this interface The menu key gauge will be zero.7)Warning display interfaceThe warning interface displayed after the protection circuit is started
(2) 40A/50A/60A operating instructions *The controller will have 1s in power after the initialization interface,and then enter the maininterface.(Note:setup parameters The controller canbe reset to the default power) *press the"menu"on in the main interface, will turn into the menu in the maininterface,short press"function" on,You can open and close the output load.
 ()The main interface display settings 1.Set the ABBORB (solar charging voltage)Figure (1), the main interface in the long press"menu" on above 3S,enter the ABSORB setup,press"menu" When the number starts to flash,press the "function" on to set the solar charging voltage.After setting,press the on again The"menu"on can be locked out.Press the "menu"on to exit (3S exit is arranged under the same operation).2.Set the FLOAT (solar float voltage)Figure (2), press the"menu"key 3S above the main interface, and then click"function" after entering the ABSORB settings interface"Key, display the FLOAT settings interface, press a menu key,and when the numbers begin to flash,press the function on again Set the solar float voltage, after setting, press the "menu"on to lock.3.Set theD voltage (battery low voltage protection voltage) Figure (3), press the"menu"key 3S above the main interface, then enter the ABSORB settings interface,and press the two function"Key, display theD settings interface, press a menu key,and when the numbers begin to flash,press the function on. The battery low voltage protection, setup is complete, click a menu on lock. 4.Set theR (battery low voltage reset voltage)Figure (4), press the "menu"key 3S above the main interface, then enter the ABSORB settings interface, and press the three function"Key, display theR settings interface, press a menu key,and when the numbers begin to flash, press the function on The battery low voltage reset, setup is complete, click a menu on lock. 5.Choose the battery charging modeFigure (5),press menu on more than 3s in the main interface, then pressfunction four times after entering ABSORB setting interface key, display battery mode settings interface, press"menu"key once, when letters start to flicker, then press "function" Select battery mode by key and select three battery type modes by function key(FLD plus liquid lead-acid battery mode, SLD) Sealed liquid-free battery mode,colloidal battery mode,default is battery mode,after setting,and then Press the menu on once to lock.6.Setting temperature trimFigure (6), press the "menu"key 3S above the main interface, then enter the ABSORB settings interface,and press the five function"Key,display temperature adjustment setting interface, press "menu" on,letters start flashing,press"function"Key setting temperature adjustment, after setting is finished, press again"menu"key lock7.Set light control modeFigure(7),press the"menu"key 3S above the main interface, then enter the ABSORB settings interface,and press the six function"on, display light control mode settings interface, press the "menu"key, the letters begin to flash, and then press "function"Key set light control mode, *00 is pure light control mode,*01-15 is hour light control plus delay mode,and 24 is load constant Open mode. After setup is complete, click a menu on lock.
 If you have problems, do not understand the operation, you can also consult customer service~
About shipping
Shipping and Packaging All itwill be double checked and well packed before sending.Itwill be dispatched within 2 business days after buyers pay for the order. It usually takes about 14 to 18 working days for delivering the package to the destination(for remote areas,it may take a little longer).
Special Announcement:
Please fill in the correct and detailed consignee, address and phone number in the order. For fast and correct delivery.If you do not receive order within 30 working days,please feel free to contact Customer Service before leaving Negative and Neutral Feedback, we will do our best to help you resolve the problem.TaxNo, you will only pay what is quoted as total cost at checkout, no more. You are not expected to pay any additional duties ores. If you are asked by Customs or our logistic partner to pay duties, please contact our Customer Service .
Your 100% satisfaction is very ant to us
If the product is not on good condition, You can return this product within 14 working days, please contact customer service center before returning.FeedbackYour satisfaction is our first priorityIf you receive the order and it is in good condition,we would be grateful if you would leave us 5 star Positive Feedback for the transaction.
Specifications
Key Features
- Certification:CE
- Origin:CN(Origin)
- Model Number:MPPT
- Is Smart Device:Yes
- is_customized:Yes
- Application:Charger Controller
- Application:Solar System Controller
- Maximum Current:60A
What’s in the box
1X Pwm Solar Controller 20a 30a 40a 50a 60a 12v/24v/48v Automatic Recognition Automatic Universal Usb Smart Charging Led Display
Specifications
- SKU: GE779GP2YNJ7YNAFAMZ
- Product Line: Generic
- Model: ROCtynkongzhiqi1822
- Production Country: China
- Size (L x W x H cm): 0.5
- Weight (kg): 0.91
- Certifications: Fair Trade
- Color: Multi
- Main Material: PVC
- From the Manufacturer: N/A
- Care Label: N/A
- Shop Type: Jumia Mall
- Warranty Address: N/A
Customer Feedback

This product has no ratings yet.
/product/79/1372941/1.jpg?0736)
Pwm Solar Controller 20a 30a 40a 50a 60a 12v/24v/48v Automatic Recognition Automatic Universal Usb Smart Charging Led Display
UGX 265,756
UGX 458,35842%
Questions about this product?